Wednesday, May 24, 2017

Thing 16: Media Skills

I thought that I would spend some time exploring some new (new to me anyway) media tools for this last assignment. This was the perfect way to end this years course. I must admit, I got a little carried away and spent a little too much time "playing" with these tools. There are so many cool tools out there!

The first tool I explored was Quozio. It was simple to use, free and very practical. I even added the bookmarklet to my toolbar so that when I see a quote in an article, I can easily create a quick image of it to display. I chose to use it a little differently for this assignment though. I am making an I-movie to advertise my Summer Reading Circle program and thought this was a perfect tool to create a question for the students without having to use the limited text options on I-movie. The quote turned out great! I could see myself using this tool for Facebook and Twitter as well.

The next tool I explored was Stencil. This tool reminded me a lot of Canva (which I love). I think I could easily learn to love this tool as much as Canva. The free account only allows 10 projects a month, but for my purposes that is fine. I don't feel like there are as many free options as Canva for images and backgrounds, but uploading images is an option. I do like that all the free images and icons are at the top of the selection list, unlike Canva which has the free content scattered throughout the options. I also kind of like the quote feature although I didn't use it for this assignment. I did however use all the other tool options for this assignment. I created another image for my Summer Reading Circles I-Movie and was able to do it within 10 minutes.


After exploring Stencil I decided to explore, the Noun Project, which I had never heard of. It is a really neat concept. I created a simple book icon. I added the color blue to it, but it didn't work. After I went back I realized that I needed to upgrade to the Pro version if I wanted to add color. As simple as the tool is, I decided that it was way more valuable than I had originally thought. I started downloading as many icons as I could and created a folder on my desktop so that when I wanted to have icons I had my own little library to pull from. Then I thought of an immediate use for some of the icons. I am going to be providing online PD for some of the faculty next year (in a similar fashion to this class), and I needed images (icons) to use for each stage of the inquiry model. I quickly used this tool to find images and imported them into my website.  I am so happy that I this tool was part of the assignment. The timing couldn't have been better!

This was one of my favorite things, because it allowed for me to play and be creative. I will be coming back to this "Thing" in the future to explore a few more tools!

Friday, April 28, 2017

Thing 27: Power Up Your Browser

I love starting new "thing." It gives me opportunity to explore new tools that I would never have thought about looking into before. I decided to take this opportunity to explore new add-ons and extensions. People are always mentioning to me different add-ons and I wonder why I don't take the time to search around, so here I am capitalizing on that opportunity.

"Pocket Icon" (Image created in Awesome Screenshot)
I started by reading 50 the Best Google Chrome Extensions. I saw that in the assignment "Pocket" was mentioned and it was mentioned again in this article, so I decided to start with that. I was very pleased with the simplicity of this extension, both in layout and setup. I instantly added it onto my desktop, ipad and phone. Now I will be able to save all the articles, videos, and images I want and view them at a later time without the need of internet. This will be wonderful when I am traveling this summer... a time in which I plan to catch up on all my reading.  I was extremely impressed with a few of the features. First, right after I added the extension, it placed an icon on my toolbar as a saving shortcut. Then I went to find an article on Twitter to try my shortcut out and I noticed there was a "pocket icon" as an option, right in the Twitter post. Second, I loved how they make recommendations of articles based on what you currently have saved. Then the final feature that I loved was that it recognized other things that I have saved in places such as Facebook and asked me if I wanted to add them to my list.

The next Chrome extension that I tried was Awesome Screenshot. This extension allows you to capture all or part of a screen and it lets you annotate, edit and blur parts of the image. It can then be shared as a URL or dragged to your desktop as a .png. Although, I love the capabilities of this extension, it wasn't as seamless to use as I had hoped. Even though there is a shortcut button for your toolbar, I couldn't get mine to work. It would allow me to select the area that I wanted to capture, but when I went to capture the image, nothing would happen. However, if I went directly to the website itself I could upload an image and edit it with ease. Once I edited & annotated the image, I dragged it to my desktop and used it to showcase the "Pocket icon" on Twitter. As you can tell the annotation was cut off and when I went back to edit the image again. It wouldn't let me change my previous annotation, I could only add a new one. So that was a little frustrating. I was going to try and make a new one, but you are only allowed 30 free ones before you need to pay. I can really see myself having a need for this tool, so I decided not to waste one of my free ones on making an additional one for this assignment. I was also hoping that you could trash one of your items and your numbers would be replenished, but they weren't. :( Overall, it seems like it will be a useful tool for me and am glad that I took the time to explore it!

After trying 2 of the extensions that were mentioned in the assignment, I decided to do a little "shopping" of my own. I was super excited when I found "Google Tasks." I use tasks while in my mail, but I didn't realize that there was an extension for your toolbar so that you can access it from wherever you want. I am one happy women! I now have an icon with a little checkmark on my toolbar and all the items that I had added when I was in mail are all in it. This is going to be much more convenient for me. :)

I loved this assignment and am going to start searching extensions and even add-ons in the future. I felt like this was a fun "shopping experience" 

Wednesday, March 29, 2017

Thing 29: Open Educational Resources

I am embarrassed to say that before this assignment, I really knew very little about search tools that existed for Open Educational Resources. I spent some time in the beginning of this assignment getting a better understanding of OER's by watching the OER video embedded in the assignment and reading through some of the resources. I particularly found the FAQ: OER for K-12 Educator pdf useful.

After reading through the materials and getting a better understanding, I started exploring many of the search tools that were suggested. Each of the tools opened a new window of excitement for me, so much so that I spent way too much time searching on some of them. My excitement quickly turned to, "How can I share this with my teachers without overwhelming them?" I decided that sending out the resources in a newsletter might be best and limiting the resources to my top 3 choices, I really didn't want to overwhelm them.

In my newsletter, I started off by giving them a brief overview, which included the video that I found to be useful and a link to the FAQ resource. Then I provided a brief description of resource with a link to the material, followed by an invitation for further help if they were interested.

From the list of OER search tools, I picked the tools that I felt had good content for Elementary teachers, were user friendly, and offered a variety of resources. Here are some of the features that I loved about each of the resources that I chose:

OER Commons
I loved OER Commons because of the search ability features, specifically that you could narrow your search between educational levels (lower primary and upper primary). In addition, I loved that they had a STEM Literacy section with resources that include templates, resources to prepare educators and teaching materials.

Open Ed
Although I didn't find this search tool as visually appealing, it was user friendly, with great advanced search options, even allowing the user to search by publisher. This search tool also provided resources in a large variety of formats such as videos, audio, lesson plans, games, interactive homework and much more. I felt that this would be extremely beneficial in an elementary school because of the discrepancy of instructional needs. Finally, our teachers could really benefit from the resources specifically designed for NGSS.

Curriki
Personally, I loved this search tool for all of the information and media literacy resources. However, I also thought that it was a great tool for teachers and students as well. The resources were laid out in a user friendly way. There was also more resources than just lessons and units, there were resources to further teachers and student understanding. I also liked the variety of formats of the resources, from links to downloadable files to webinars (there is a great one on teaching NGSS in a first grade classroom). A nice touch to this tool is that the resources could be reviewed, making searching for good resources a little easier. I will say that I didn't find a couple of resources on here with broken links, so having a review or being able to write a review is helpful.

Tuesday, March 21, 2017

Thing 35: Web Presence (including LibGuides)

I explored "Thing 35: Web Presence" not because I don't have a web presence, but because I thought my website needed a little boost. I have used Weebly for several years, which I love and after reading the "Brown Bag Teacher" blog post, I felt confident that I am already utilizing the tools and features that were highlighted by Catherine Reed.

I decided to explore the list of library sites that were posted in the assignment to see if I could get any ideas for my website. After exploring all of the sites, most of which were middle and high school, I determined that my site really lakes a "reading presence." There are a lot of resources on my site, highlights of student work and programs being offered. However, when it comes to supporting book lovers, book recommendations and generating an excitement for reading, I feel that I have really "dropped the ball." Therefore, I chose that to be the focus of this assignment. Little did I know how tedious this process was going to be.

I started of viewing other websites and looking for ideas and resources that others were using that I would like to include on my page. On the Springston School Library Blog they had links to different resources for book recommendations so I decided to start by including several of those on my site: The Book Seeker, Everyone's Reading, and Literature Map. I also loved how on their site there were pictures of kids reading or celebrating reading and I knew I wanted to capture that as well. For this assignment I started by including pictures that capture readers, but eventually I would like to include and imovie on this site.

On the Staples Library Learning Commons site, I liked the idea of displaying resources with a Symbaloo, but I didn't really feel like that fit with what I visually wanted for my website. In the past, I had used Shelfari and I loved the visual layout of that. I started out with the hopes of building shelves for my page, but unfortunately, I was extremely disappointed to learn that Amazon is no longer offering this services. I next looked into other options such as Goodreads, which isn't as kid friendly in my mind and I even read an article "12 Alternatives to Goodreads"  so I decided to start with that. I tried many of the suggestions, but they were most sites to help gain recommendations, not to provide them by building a shelf. Some were pretty cool though. Next, I tried to see if I might be able to embed my book shelf from Destiny Quest. I couldn't seem to find a way to do that either, I could print my shelves or email them, but not embed them. I then found an article on Shelfari Alternatives and found many of the same ideas that I had before, with a few additions. I tried Shelvable, which was simple and had a great layout, but I wasn't able to embed my shelf onto my site. I like how this site offered a great deal of information about each of the books from the description, to book details, to Goole Preview. Booklikes had a lot of potential as well. I like the look of the shelf and I could add a widget to my site, however creating shelves and adding books wasn't as easy I would have liked.

In the end I decided to go with Symbaloo, but I am open to suggestions. The nice thing about "Book Lovers" page on my website with Symbaloo pages of recommendations for each grade, K-6. The formatting is a little funky, but overall, I am happy to have a resource for students, teachers, and parents to find recommendations.
Symbaloo is that I am able to connect the kids to the catalog and they can go directly to see descriptions, detail and whether the book is currently available. Since that point, people have suggested Library Thing, but I was well into building my Symbaloo pages and didn't want to switch gears at that point. The Symbaloo pages took an extremely long time to put together, but I now have a

I will continue to add and tweak as new ideas and resources come to me, but at this point I am happy to say that I have an exciting "boost" to my website! In the longterm, I hope to work with Sarah Olson, our High School Librarian to also give our site/s an additional boost, by including a feature similar to what is on East Syracuse Minoa Central Schools site. They have the words "Lead-Learn-Innovate" on their with a direct link that takes you to a Google Slideshow of what each of those things means in the library. We would like to play with that idea for our mission or maybe goals and mantra. Sarah and I might even team up for a "DIY Thing" for that.

Tuesday, February 21, 2017

Thing 3: Twitter Online Communities

I have this saying in the library that says, "Welcome to the library, where we are failing, succeeding and growing." To me when it comes to Twitter I feel this quote holds true. It took me a long time to commit to Twitter and recognize it as the powerful tool it is meant to be. Although, I don't think I "use" it to it's fullest power, I do think that I at least "recognize" it now. I have done this assignment, I believe in each of my "Cool Tools" classes, and each time I seem to fail, succeed and grow a little more. I am slightly frustrated in saying that this third attempt, although had success it had many failures.

I started off this assignment wanting to find a way to connect my social media platforms, specifically Twitter and Facebook. It can be time consuming to share out what is happening in the library to both platforms, so I was excited to explore ways to post to both of these platforms through one post. I began looking at Hootsuite because it had come recommended to me by many people and was listed as one of the ideas for "Veteran Tweeters." However, when exploring it seemed like there was a cost associated with it and it seemed like it was more advanced than what I was looking for.  I quickly "jumped ship" and began exploring "If This Than That."

"IFTT" is an app available for iphones and ipads. This is free and extremely easy to navigate. All options are laid out for you in a tile format and you are able to simply select what posting options you would like. However, I ran into many struggles along the way. First to my frustration it kept syncing to my personal account and not my "library" account (first failure). Once I finally was able to link it to my library account, I couldn't figure out how to link it to a "page" it would just link it to my main account. I finally found an option that allowed for information I post on my main page to also post on all of my other "pages" in Facebook. I was excited about that, but it presented me with two other problems. The first being that because you can only make a business page on FB off your main page, I was now forced to make all my posts on my main page, which I worry about people now being able to make posts on (hmm... I guess I could just not accept their friend requests). The second issue was when I wanted to post a picture with my status the picture didn't post on in the status, just the message. I figured out that I could get the picture to post to Twitter by using the hashtag #tw after my post. However, I still wasn't able to get the picture to go to my "library page." Ugh...

After a lot of exploring I finally found an option to send photo upload on FB page to Twitter w/ image. However, although that was a success, it proved to be another failure because when it posted to Twitter it showed the status, but the picture holder said "image could not be found." (Sigh...)

Like I mentioned earlier, I had many "failures and successes" in this assignment, but in the end I do feel like I "grew." I am not giving up yet though. I will keep you posted... as I try to find a way to get my photos to attach with my status while posting to my "library page."

I do suggest trying IFTTT though because they have so many cool options that don't have to do with Twitter and Facebook. I am looking forward to exploring more options... when I am a little less frustrated.

* As an added comment, I did try Buffer, which very easily posted to pages, but they only gave a 6 day free trial. Was I missing something? When I signed in it said that there was 10 free connections. Hmm...

Wednesday, January 18, 2017

Thing 18: Student Assessment and Feedback Tools

While on a run one day with a friend who is a literacy coach in a neighboring district, she asked me if I had ever used "Orange Slice." I had never heard of it, so instantly looked into it. I quickly began to play with it and liked the potential that it offered, but found that there was a huge a learning curve and since I didn't immediately have a need for it, I gave up on it. So, I thought I would take the opportunity to revisit it during this online class.

What is Orange Slice? 

Orange Slice is a free add-on from Google. It allows for you to create a rubric within an assignment on a GoogleDoc and individually grade and provide feedback to each individual students work. Once the rubric is created it automatically provides the student with a grade. It even pairs with Google Classroom when grading assignments. There is also a feature for student rubrics, where students can peer review each others assignments. This is a feature that I did not look into, although in hindsight that might have been a good option for my students to review their own work.

As mentioned above there is a learning curve when trying to start. So, in this attempt to learn the tool, I went out to find some tutorials and came across an article written by Joyce Valenza in SLJ that featured Orange Slice. She does an excellent job explaining the tool and also provides tutorials within her article. If anyone is interested in learning how to use Orange Slice, I found her article to be the most helpful:  http://blogs.slj.com/neverendingsearch/2015/12/12/orange-slice-rubrics-for-docs/.

If you would rather not read the article and just watch a tutorial, I felt this one was a great one to start with:

How I used Orange Slice? 

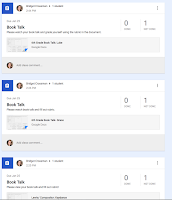
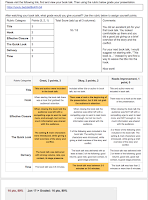
I decided that I wanted to be able to grade our 6th grade students on their book talks that they were required to give weekly in the library. I had given the students a checklist of things that I was looking for in their book talk and then used the Orange Slice add-on to create a rubric to assess those things. 
This process was a little frustrating at first. Getting the add-on is not a problem at all, but once you begin to build your rubric it takes some time to learn what each of the options are asking you. I often times chose an option that wasn't doing what I thought it was supposed to do. I quickly learned though, that you can add and edit anything just like you would in building any table in Docs. Once you start building your table and you get to the option that says: "Categories" you can pick a blank one and it will put one blank row on your table and five columns. You can add rows from there and delete the columns as you wish as well. Once you finish and select "Sore rubric" it will automatically account for the changes that you made to the rubric. 

I know that Joyce Valenza claims this is easy and I do want to stress that once you build it and learn it, it is beyond easy, but it does take time initially. 

Some quick tips for your first use:
  • Have your rubric layout sketched out on paper.
  • Add your own rows and columns to your table (you don't need to use theirs). 
  • Everything is editable and changeable.
  • Be patient it is worth it!!! 
Once your rubric is made you can copy and paste it into any Google Doc.


The tricky part for me was that I wanted to have students view their book talk first, grade themselves and then I wanted to be able to give them their final grade using the rubric that I pasted into their assignment. I was having trouble doing this at first because I couldn't submit the entire assignment within a Google Doc and share their individual links. Even if I indicated that I wanted a "copy" for each student they wouldn't have their specific link to their video. Lucky for me a few days ago Google came out with the new feature that we could create individual assignments. Now, I can use my template, insert the individual link and create an individual assignment for each student in Google Classroom. This worked perfectly!! 
The students were able to view their assignment, watch their video, use the attached rubric to grade
themselves and then return it to me for a final grade. It was so simple to be able to grade inside the assignment with the rubric embedded. All I needed to do was click on the box, it highlighted it and then gave them a grade. It was also nice for the students to be able see the criteria attached within the assignment to clearly let them know the expectations. The best part is, now I can embed this rubric into any assignment on a Google Doc.

Overall, I would say, give it a try or at least suggest it to your teachers. There is a learning curve, but once you become familiar with it, it will save you tons of time on the back end.

Friday, January 6, 2017

Thing 9: Database and Search Tools

I chose this "thing" because I am always looking for new search tools that are applicable for elementary students. As much as we have a strong list of databases that we offer our students, both the students and the teachers want to search the Internet. Therefore, I decided to venture into the resources and articles listed under this assignment. I first started off with the idea that I was going to find new search tools or ideas for helping students to search and ended up in a completely different direction. I began by reading, "6 Steps to Teaching Students to Search" to see if there was any new tips/ strategies that I could pick up that would helper younger students search on the Internet. Unfortunately, this article didn't provide any new information for me. Next, I read an article in the School Library Journal, that caught my attention, " Goodbye, Boring Database Instruction. Hello, Search App Smackdown." I was instantly engaged in this article from the onset. Brenda Boyner, discusses how database interaction can become "tired-and-boring" and that she developed instruction that became more meaningful to the students. She started off by no longer calling them databases, but "Search Apps." She then took it one step further by creating a "Search App Smackdown."

The "Search App Smackdown" peaked my interest for two reasons. First, it seemed like it could help make databases more appealing to the user. Second, it seemed like it will allow me to actually spend quality time teaching the databases and comparing different databases. Unfortunately, some of the resources & links mentioned in the article, I wasn't able to access, but I was still able to get the main idea. Basically, she takes two of the databases creates a video tutorial of each of the databases and assigns them to watch them for homework (flipped classroom approach).While watching the videos student fill out notes on an organizer (I couldn't find this resource at first, but was able to find it in the "comments" section at the end of the article). The next day they come to class, hand in their organizers (which get graded) and form teams. Each team uses the databases to answer a series of question cards. Once the team answers the questions they have a "runner" deliver the answer to the librarian. The librarian indicates whether they have the right answer and awards points.  This game allows students to quickly navigate the databases and their featured tools/ resources, while also making learning fun and meaningful.

Although, I love the concept of the Smackdown and how it gets the students to use the databases, I don't have the same type of class structure/ opportunity as this High School librarian has. I don't have the ability to assign homework to the students and I don't offer them grades. However, I can certainly use the concept. First off, all our students have iPads K-4 and we have already turned most of the databases into apps, so the idea of calling the databases, "Search Apps" will be easy enough. However, what I decided to do was take an idea from what I saw at a NYSCATE conference and blend it with this "Smackdown" concept.  They had a variety of presenters get up and present a new App and they had 3 minutes to give a quick tutorial on it. Once their time was up they said, "Slam" and the audience repeated. The next person had 3 minutes to showcase the next tool. In the end the audience voted on who presented the best tools. Surprisingly they called this "App Smackdown" as well.
Evaluation Sheet
(Please let me know if you would
like access to this document)

Here is my idea for a hybrid of the activities that I think will be both engaging and meaningful. We are starting an inquiry on the American Revolution in 4th grade. This is a 2-3 week unit that I usually introduce various databases along the way. I would love to be able to spend a little more time having both the teachers and the students look more closely at the databases. So, I am going to ask the teachers if they would be open to competing in an "App Smackdown" with me. At the beginning of a lesson, both the teacher and I will have 3 minutes to share a database with the class. We will then have the students use the "Search Apps (databases)" during their research that day. At the end of the lesson students will need to fill out an evaluation sheet that I created indicating which "Search App (database)" won. We will continue to do this throughout the unit, allowing for the students and teachers to learn several new databases and new content as well. Of course, there should probably be a prize for the winning resource! Any ideas???